|
|
|
|
|
FIX AND
FIT
Seeing Life with Blinders
On
By Alex Yoho, ABOM
Seeing life with blinders on is usually thought of in a negative light, but for those with dry eyes or extreme light sensitivity, blinders may be just what the doctor ordered. In a recent Fix & Fit we discussed adding ptosis crutches. Often, using a ptosis crutch can add to the dry eye problem by keeping an eyelid from bathing the eye in tears. Other instances of dryness can be caused from lack of tears at all, or working in a dry, windy environment.
The type of �blinder� we can manufacture for this problem is called a moisture chamber. Usually a moisture chamber is clear to allow vision as normal as possible. There have been (and may still be) moisture chambers that are similar to an eye patch, but the ones we�ll discuss here will be integrated into the eyeglasses themselves.
In the past it was possible to obtain pre-cut vinyl sheets specifically for this purpose. Unfortunately, these have been discontinued, so the first thing you will need to procure is some sheet vinyl. The best I have found is the type that you get at your local hardware store and is sold for the purpose of covering drafty windows in the winter (this may be a problem for those in the extreme south). This material is transparent and relatively free of optical distortion so the patient can be aware of peripheral surroundings. There are several thicknesses available and I prefer to get the thickest I can find.
|
|
|
|
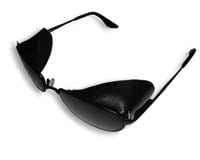
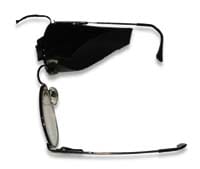
The procedure in the works. This moisture chamber is made from a dark material, but you may use clear vinyl from a hardware store to allow peripheral sight. |
|
The Procedure
The way to create the moisture chamber is to trap the vinyl sheet between the frame and lens so that it extends behind the frame far enough to touch the patient�s face. This, of course, traps any moisture within the chamber and prevents air from entering and drying the eye.
Start by removing the lenses and using them to measure the length of vinyl to cut by rolling the edge of the lens one revolution across the material. Add about one half-inch for the total length. For the width you will need to allow enough material to reach from the eyewire back to the side of the head. I usually use a width of about three inches, which is much more than necessary, but it will make assembly easier.
Since the thickness of the material prevents the eyewire from closing, the lens must be edged smaller. It obviously helps if you have a hand-edging machine, but you can do the job without one if you�re careful. Using the existing lenses, work the material around the lens and patiently ease the lens and material into place. While using sizing pliers to apply a reasonable amount of pressure, measure the gap between the eyewire barrels. When you order the lenses from the lab, reduce the circumference by the amount you measured. It�s also good to have a sharper-than-normal bevel applied to lock the material into the eyewire.
|
|
|
When you get the lens from the lab, wrap the vinyl around the lens so the overlap of the length is at the nasal area. You can use the nose pads for a guide. The worst part of this customization is working the lens and the vinyl material into place without losing your patience. If you can get everything in place, use an extra long locking screw (the type with gummy stuff on the threads) to ensure that this will not come apart. The longer screw also allows you to partially close down on the lens to hold things together while tugging here and there to straighten out the vinyl.
I usually start with the material protruding from the front about 1/4-inch and tug on the temporal edge to flare the material out toward the temple. This will allow the material to just rest against the face. If you pull too much, you can pull a little at the nasal, top, and bottom to straighten it out. The real trick in this procedure is to tug enough to position the vinyl without popping the lens out.
Now we need to trim things up. First take an X-Acto knife and slice off the front overhang by running the point between the eyewire and lens. Take your time; it�s easy to slip and cut yourself or scratch the frame or lens when doing this. For the back portion, you can rough things into place by trimming with scissors and trying the eyewear on yourself. Trim enough so the eyewear will not quite go on so you can fine-tune the fit on the patient. When your moisture chamber is close to fitting, it will look somewhat like a safety side shield but will continue all around.
When you are ready to do the final fitting, make sure to tell the patient to plan on a long fitting session since you will be trimming very small amounts at a time. You may want to purchase some quality manicure or surgical scissors so you can make a smooth cut.
When properly fitted, the vinyl should just touch the face yet not so much as to push the eyewear from it.
|
|
|
|
|
|
Other Uses
Another problem that can be solved with this type of customization is to create soft side shields. A patient who is extremely light sensitive will benefit greatly from a black leatherette side shield with a dark lens. I have made these for individuals who wish to hide a deformed or missing eye, and for a stroke victim whose eye lacks control but still has sight and is therefore visually confusing. If you really want to occlude the vision, I highly recommend that you frost the inside of the lens and tint it as dark as possible. Without it, patients may be distracted in bright situations. I have also painted the inside of lenses, but it does not last as long.
Recently I have found a great use for this type of shield as an add-on for those doing extreme sports in high altitude or very cold climates. A genuine leather shield can make a rich looking pair of sportswear for the eyes when combined with a blue-blocking polarized lens with a gold mirror coating. Of course, sometimes people want their peripheral vision so you�ll want to use a material that is transparent, but tinted or maybe a screen-like material.
The possibilities, as always with eyewear, are almost endless!


