Eye on Equipment
Demystifying Rimless
Lenses
By Susan P. Tarrant
Rimless eyewear has become more popular than ever, and because of high-end lens styles and treatments usually associated with the eyewear, it has become a revenue center. But edging and drilling three-piece mounts is not without challenges. Here, edging and drilling experts provide helpful tips.
QUESTION: How can I achieve the best appearance when grooving a thicker, high-powered rimless lens?
|
|
|
|
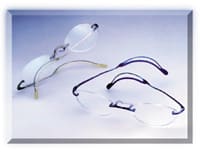
Rimless eyewear, such as Charmant's i-NOVA style 10100, builds revenue |
|
ANSWER: For the best appearance, one technique is to place the groove more toward the front of the lens instead of mid-lens. This helps to minimize the thick appearance of the lens.
With a table groover, it takes a skilled operator to achieve the best placement since the device does not measure the lens thickness or curve. In contrast, a patternless edger with an integrated autogroove function can do this automatically. These edgers have built-in software that's programmed to measure the shape, curvature, and thickness of the lens to automatically determine the best placement of the groove from an aesthetic viewpoint. It's also important for an automatic autogroover to have an override feature that allows the operator to manually adjust the groove placement forward or backward if desired, as in the case of a lens with varied thickness or if the patient has a cosmetic preference.
--Rob Greco, New York metro sales manager, Briot-Weco USA
QUESTION: When prepping to edge a three-piece mount, do I need to handle my patternless edger differently than when edging a framed lens?
ANSWER: It is important, when preparing for a rimless job, that your tracer knows the job is rimless. If you program your edger specifically for a rimless job, it knows how to adjust itself properly at the beveling stage. Setting your automatic edger for rimless will ensure a more accurate lens sizing.
--Susan Polson, director of marketing, National Optronics
QUESTION: When edging a semi-rimless lens, I have a hard time getting the cord to fit properly and securely in the groove. Am I doing something wrong?
ANSWER: Instead of the nylor cord that's used with lenses that are going into full-framed eyewear, semi-rimless lenses are wrapped by a thin metal cord. Since it is thicker than nylor, this metal cord requires a thicker and deeper groove.
My technique has been to use a caliper to measure the width and depth of the wire, and then to indicate that measurement in the "rimless grooving" mode of the automatic edger. If the proper measurements are input, the edger will do a wonderful job.
--Franco Aluigi, product manager, Santinelli International
QUESTION: My rimless lenses look crooked when assembled. Why?
ANSWER: If axis is off, rimless eyewear is going to look crooked. You will be able to see it's off. Maintaining axis control will alleviate this problem. Rimless eyewear needs even tighter axis control in the edging and drilling stages--sometimes even tighter than what's prescribed. Be sure you have an edger that has good axis calibration and variable clamping pressure. Rimless lenses require less pressure--variable clamping pressure would allow you to select a fragile setting that creates less torque.
Another tip: Use "free blocks" that don't use leap pads. Try the wax blocks that are heated and mounted to the lens.
--Marc Okrant, group product manager, Gerber Coburn
|
10 DRILLING TIPS |
The most essential part of processing rimless eyewear is the drilling. If not drilled precisely, the eyewear can be crooked, ruining its aesthetics. Also, cracks and other problems may occur, forcing a redo. So we asked four pros from the world of optical drills to provide some tips for getting a perfect drill the first time. Those providing information were:
1. When drilling polycarbonate and the lens heats up, tiny stress fractures can appear around the hole that could eventually crack all the way across the lens. To avoid this, "pulse" the drill by pushing it in a bit and pulling it out, then pushing it in a bit more, pulling it out, etc. This reduces the amount of heat caused by the friction of drilling. 2. If the Rx is a high minus, drill the holes at an angle or the temples will appear to be out of their parallel. 3. Make sure the lenses are dead-on axis before they get to the drill, or else you'll have to compensate at the drilling stage, something that's NOT recommended. Check the axis at each stage of edging. (One drill company even provides an "axis aligning bar" to help make sure that all of the equipment is on-axis). 4. Avoid having patients choose their own shape of the lens (instead of going with the demo lens shape). 5. If working with less-expensive or knock-off frames, the studs for the screws often aren't lined up right. So, when you drill, it will come out crooked. Check first for alignment or bend the screw to properly align the frame. 6. Always ask the frame manufacturers if they supply kits with the right drill bits and alignment specs. Several do. 7. A too-slow RPM on the drill (or a cheap or dull bit) will cause crazing on polycarbonate. 8. Depending on the frame style, hole size can be absolutely critical. Look for a drilling system with a wide variety of drill bits. 9. Avoid having metal touch the lens. When choosing frames to stock, it may be easier working with styles that have some type of sleeve over the screw. 10. And the most often cited tip: Keep the drill bit sharp, sharp, sharp! Replace it often, or use a carbide bit that doesn't get dull. |


